In this topic
Models are a way of visually exploring or presenting the data in your project.

You can use models:
To set out and review initial ideas or theories about the topic or question of your project
To visually represent the relationships between project items
To identify emerging patterns, theories and explanations
To provide a record of stages in a project
At the beginning of your project, you might use a model to plan your project and sketch your expectations or initial ideas. Later on, models can help to show links between concepts or items in your project.
Models are made up of shapes and connectors. A model can contain linked shapes, unlinked shapes or a mixture of both.
Unlinked shapes are not linked to project item (useful for early ideas). Unlinked shapes are not affected by changes in your project. If you convert an unlinked shape to a project item—it will become a linked shape in your model.

Linked shapes are linked to project items. You can create a linked shape by adding a project item to your model, or converting an unlinked shape to a project item. The project item icons on the shapes indicate that they are 'live' to the data. If you change the name and description of the shape, you change the name and description of the project item. If you delete a project item that is linked to a shape, the shape remains in the model but is displayed with a red cross ![]() and you can no longer open the linked item. You can delete project items directly from the model—refer to Interact with your project via a model for more information.
and you can no longer open the linked item. You can delete project items directly from the model—refer to Interact with your project via a model for more information.

Linked connectors represent relationships, 'see also' links and memo links that have been added as associated data to project items in your model. You can convert a connector from unlinked to linked or from linked to unlinked.
When you create a new model in NVivo, you create a 'dynamic' model. Dynamic models can be changed—for example, you can add shapes, add project items, convert unlinked shapes to project items and so on.
A static model is a read-only 'snapshot' of a dynamic model. Creating a static model can be useful if you want to keep a record of your project at a particular point in time. By regularly creating static versions of your dynamic models, you can record the development of ideas, concepts and node hierarchies.
When you create a static version of a dynamic model, all links to project items are removed, so the static model is not affected by changes to your project. A static model cannot be changed, and you cannot enter edit mode when you have a static model open in Detail View.
You can identify the dynamic and static models in your project by their icons:
|
Icon |
Description |
|
|
Dynamic model |
|
|
Static model |
You can double-click a model in List View to open it in Detail View.

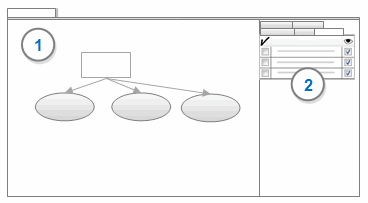
1 The model canvas.
2 The Model Groups Pane. This pane can be hidden to give more space to work with your model. For more information, refer to Use groups to show or hide items in a model.
When the model is open in Detail View, you can use the horizontal and vertical scroll bars to move around the model. You can use Zoom to focus on an area of the model, or Zoom out to see the whole model at a reduced size.
If you want to change the model, you must enter edit mode. You cannot change a static model.
When working with a dynamic model you can:
Arrange shapes and connectors—manually or with automatic layouts. Refer to Change the layout of shapes and connectors for more information.
Add shapes and connectors.
Add project items (as linked shapes) to your model.
Convert unlinked shapes in your model to project items.
See associations between the project items represented in your model. Refer to Interact with your project via a model for more information.
Group project items and then show or hide the groups as required. This allows you to show stages or different views on the same model. Refer to Use groups to show or hide items in a model, for more information.
You can use model groups to select, show or hide project items based on classification, attribute value, relationship type or item color. For example, if your model includes linked shapes representing survey participants, you could hide the shapes that represent participants of a particular age group.
You can also create custom groups to break a model into simpler views—for example, group nodes in your model that represent negative opinions, positive opinions and neutral opinions. Refer to Use groups to show or hide items in a model for more information about grouping items in models.
You can create and apply custom model styles to differentiate elements in your model. For example, you could create a model style for nodes representing negative attitudes, and another style for nodes representing positive attitudes. Then you can apply these styles to shapes in your model to visually emphasize the different attitudes of your survey participants.
Refer to Change the appearance of shapes and connectors for more information on using model styles.