You can use framework matrices to summarize your data in a grid format—this is especially useful if you are working with interview or focus group transcripts.
Framework matrices are available in NVivo 9.2 (or later). If you are using an earlier version of NVivo 9, we recommend you update your software—refer to Software updates for more information.
In this topic
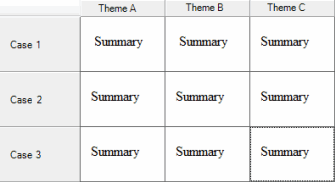
NVivo does not prescribe an analytical approach but provides tools to let you work the way that suits you best. Framework matrices provide a way to summarize or condense your source materials in a grid that has rows for cases (for example, people you interviewed) and columns for themes. Each cell in the grid represents the intersection of a case and theme—when you enter text into the cell you can create a summary of the source content relevant to that case and theme.

Summarizing source content allows you to condense large volumes of interview material into more manageable quantities and can help you to gain insight and familiarity with your data.
Working with condensed source materials in the framework matrix can make it easier to:
See everything about a theme by looking down a column
See how different themes relate to each other for a particular individual by looking across a row
Compare the experiences of different individuals by comparing one row to another
Once you have condensed your source materials in a framework matrix, you can easily share your data with others by printing the matrix or exporting the matrix to a spreadsheet.
Refer to Approaches to working with framework matrices, to learn more about how you can use framework matrices within your NVivo project.
NOTE Framework matrices are available in NVivo 9.2 (or later). If you are using an earlier version of NVivo 9, we recommend you update your software—refer to Software updates for more information.
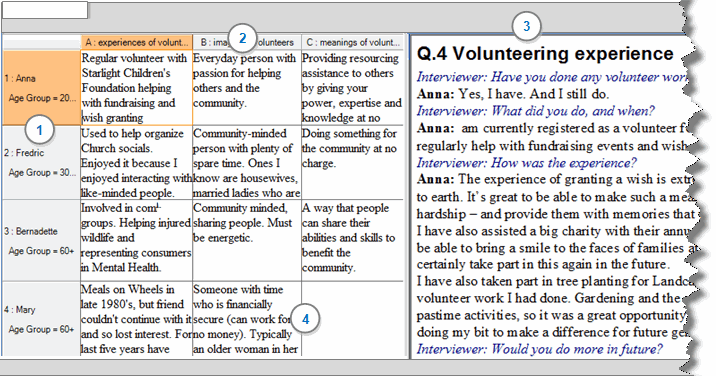
In this example, a framework matrix has been used to summarize the responses of four different people who were interviewed about volunteer work:

1 Rows—each row represents a case node. In this example, the cases are people; Anna, Fredric, Bernadette and Mary. The row headers can display the attributes of the case—in this example, the row headers show the age of the people you interviewed.
2 Columns—each column represents a theme node. In this example, the themes are; experiences of volunteering, images of volunteers and meanings of volunteer work.
3 Associated view—a node that (by default) displays source content that is coded at the row (case). In this example, the associated view is showing Anna's interview transcript. You can change what is displayed in this view (for example, show content coded to both case and theme nodes) or hide the associated view if you want more space to work with the matrix—refer to Work with framework matrices for more information.
4 Cells—each cell is the intersection between a case and theme node. For example, the first cell in the matrix contains a summarized version of what Anna said about her experiences of volunteering.
Cells are blank when no summary has been created for the intersection between the case and themes nodes. When you first create a framework matrix in your project, all the cells are empty. As you work through your interviews or other source materials, you will gradually fill in the cells.
NVivo will allow you to use any combination of nodes for the rows and columns in your matrix, however to get the best results, we recommend you select:
Case nodes (for example, your interview respondents) for the rows—you can optionally include node attribute values in the row headers
Select theme nodes for the columns
If you include attribute values in your row headers, then the rows are ordered by their attribute values—otherwise the case nodes are listed in the order that they appear in your project. You can change the order of rows in the matrix, by changing the order of attributes in the row headers.
If you want to be able to print the framework matrix to a single page, then you may need to limit the number of rows and columns that you include in the matrix.
You can add or remove rows and columns from the framework matrix after you have created it. Summaries are stored separately in your project—removing rows or columns from the matrix does not affect your summaries. Refer to Understand how summaries are stored in your NVivo project for more information.
Refer to Create and change framework matrices for more information on how you can create and modify framework matrices.
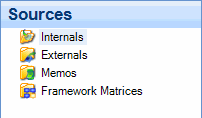
Framework matrices are stored in the Framework Matrices folder within the Sources group in Navigation View:

You can double-click a framework matrix in List View to open it in Detail View.
When the matrix is open in Detail View, by default the matrix is on the left and the associated view is on the right. You can use scroll bars to move up, down, left and right in the matrix or in the associated view.
When you click in a cell in the matrix, the text in the cell becomes editable. You can switch edit mode off (or on) for the current cell by pressing F2. Pressing ESC also switches edit mode off and discards any changes you made to text in the cell.
You can use the arrow keys to move around the matrix. When a cell is editable, using the arrow keys moves the cursor around the text in the cell.
You can also use keyboard shortcuts to move from the matrix to the associated view and back—refer to Keyboard shortcuts for more information.
The associated view is a node, containing coding references that were created by coding your source materials. By default, the associated view shows content coded to the row (case) node.
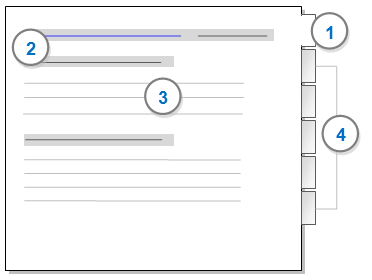
When you first open a framework matrix, the Reference tab of the associated view is displayed. On this tab you can see all the references that have been coded at the node.

1 The Reference tab is displayed when you first open a framework matrix
2 Coding information (shaded in grey) shows the name of the source that was coded at the node, the number of references that are coded and the percentage of the source that the coding represents. You can open the original source by clicking the source name hyperlink.
3 Textual content that is coded at the node is displayed in the Reference tab. For non-textual content, only the location of the coded content within the source is shown (for example, the start and end times of a coded section of audio).
4 The associated view has separate tabs for each type of source content that is coded to the node—Text, PDF, Picture, Audio, Video or Dataset. If you want to work with non-textual content, you will need to use these tabs—for example, if you want to summarize audio content that has not been transcribed, you will need to click on the Audio tab.
When working with the associated view you can:
Change what is displayed—you can display row coding, cell coding or summary links. Refer to Work with framework matrices (Choose what you want to show in the associated view).
Turn on highlighting to help you identify content that is linked to your summaries, or content that is coded to your theme nodes. Refer to Work with framework matrices for more information.
You can change the position of the associated view or hide the associated view if you want more space to work with the matrix. Refer to Customize the display of framework matrices for more information.
Because the associated view is a temporary node, you can use node view settings to:
You can also show coding stripes in the associated view—you can use the coding stripes to identify the location of coding, but clicking on a stripe does not highlight coded content (as it would if you were working in a source or node).
If you have annotated your source materials or added 'see also' links to record connections in your materials, you can view this information in the associated view—select the Annotations or See Also Links check boxes, in the Links group, on the View tab.
NOTE When you undock a framework matrix, the associated view is closed. If you always open project items in floating windows (you can select this setting in NVivo's application options) when you open a framework matrix, you will not see the associated view. You must dock the window to work with the associated view.
It is a good idea to consider what you want to show in the associated view before you start summarizing. By default, you will see content coded at the row (case) node—if you have done thematic coding, you might prefer to show content coded at the cell intersection (at both the case and the theme nodes). Refer to Work with framework matrices (Choose what you want to show in the associated view) for more information.
As you read through the content displayed in the associated view, you can enter your summaries by typing directly into the cells of the matrix. You can also copy and paste content from the associated view into the matrix cells.
You can link text in summaries to content that you can see in the associated view. For example, you might want to link a paragraph in the summary back to the verbatim text in an interview transcript, so you can easily locate the supporting source material.
Refer to Work with framework matrices for information on entering summaries and linking text.
NOTE If you have coded your sources to thematic nodes, you can create summaries automatically from your coding. Textual content coded at both row and column nodes is copied into the matrix cell. You can then edit this text to reduce and synthesize the material.
Summaries are created and viewed within a framework matrix, but each summary is stored separately in your project. If you delete the framework matrix, the summaries you created within the matrix are not deleted.
Each summary is associated with the intersection of a row and column node (the case node and the theme node):
The summary can appear in more than one framework matrix—the summary will be displayed in any framework matrix that includes its row and column nodes.
If you delete one or both of the nodes, then the summary is also deleted from your project.
If you copy one or both of the nodes, then the summary is also copied with the newly created nodes.
If you merge two nodes together, their summaries are also merged.
If you want to identify the nodes in your project that have associated summaries, you can use Advanced Find—refer to Find project items (Find project items that meet specified criteria). If you want to view the summaries, you will need to create a framework matrix that includes these nodes.
NVivo 9.2 (or later) provides support for the Framework method. The Framework method was developed by the National Centre for Social Research (NatCen). To find out more about this methodology, refer to the Framework page on NatCen's website.
If you have a project created in NatCen's FrameWork software application, you can convert it into an NVivo project and continue working with it in NVivo. Refer to Open (and convert) a FrameWork project for more information.