When working in sources or 'coding on' in a node you can
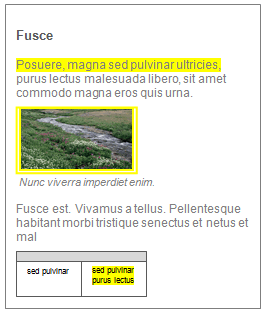
Highlight the content coded at selected nodes, attributes or users—content is highlighted in yellow.
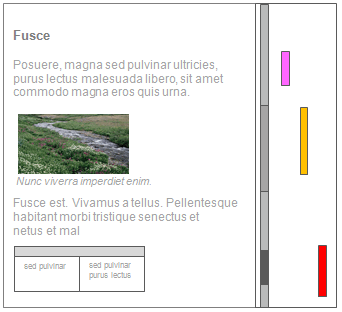
Display coding stripes—colored bars that enable you to see the coding for a source or node. You can also display stripes to see which specific users have coded the content or to see the attributes of coded content.
What do you want to do?
To see what has been coded in a source you can turn on 'highlight coding':

Highlighting is an easy way to check what you have and have not coded. If you want to see the coding for specific nodes, you can display coding stripes—refer to Display Coding Stripes for more information.
To turn on highlight coding:
Open the source or node in Detail View.
On the View tab, in the Coding group, click Highlight.

Select what you want to highlight:
Coding for Selected Items this opens the Select Project Items dialog box— select the nodes to highlight, and then click OK to close the dialog box. The nodes in bold indicate they have been used to code the content.
Coding for All Nodes this highlights coding for all nodes
NOTE
To turn off the highlighting—on the View tab, in the Coding group, click Highlight then select None.
The option Matches for Query under Highlight becomes active when you are viewing items that are the results of a query—the content highlighted in yellow matches the criteria set in your query.
To change the nodes that are highlighted, click Select Items under Highlight to re-open the Select Project Items dialog box.
In the Application Options (Display tab), you can specify that you want coding automatically highlighted when you open a source or node.
For picture sources, you can adjust the shading density of the highlighted picture region. Refer to Adjust picture settings (Adjust the region shading used to mark coding, links and annotations) for more information.
Coding stripes are colored bars that show you the nodes that code a source:

The stripes show you
Nodes that code specific content
Users who coded the content
Attributes of coded content (sex, age and so on)
You can select the nodes that most, least or recently coded the content and indicate the number of stripes to display. Refer to Set the default number of coding stripes for more information about the coding stripe display.
In audio and video sources, coding stripes are displayed both in the timeline and the transcript. This is called 'shadow coding'. Refer to Basic coding in audio and video sources (Understand shadow coding) for more information.
The color of the stripes is either automatic or user assigned based on item colors. If the color is based on item colors, any nodes that have no color will display as white. Refer to Set colors for more information.
When a source is in edit mode, coding stripes are disabled (and do not update) while you type or make other changes to the content of the source. The stripes refresh automatically when you:
Code or uncode the source content
Switch to read-only mode
Save the project
Use the 'undo' function
You can refresh the stripes manually—click the yellow information bar at the top of the coding stripes pane, or click Refresh, in the Workspace group, on the Home tab.
NOTE If you code text in a cell in a dataset, a text table (in a document, memo or external), an audio/video transcript, or a picture log, the coding stripe is displayed against the whole row. Similarly, if you code content in the left-hand column of a PDF source, the coding stripe is displayed against both columns.
Open the required source or node.
On the View tab, in the Coding group, click Coding Stripes.

Select which coding stripes you want to display:
Selected Items displays the Select Project Items dialog box—select the nodes then click OK to close the dialog box. The nodes in bold indicate they have been used to code the source content.
Nodes Most Coding displays the most frequently used nodes of all the nodes that code the content
Nodes Least Coding displays the least frequently used nodes of all the nodes that code the content
Nodes Recently Coding displays the most recently used nodes of all the nodes that code the content
Coding Density Only shows only the coding density bar—refer to Check the coding density for more information
Show Items Last Selected shows the nodes that were last selected for viewing. This option can be useful when you want to check coding at the same nodes across multiple sources.
NOTE
When you choose the most, least or recently options, the default number of stripes displayed is 7. You can change this default in the Application Options (Display tab) or in the Number of Stripes under Coding Stripes.
You can also display coding stripes by right-clicking on the Coding Density bar and selecting Show Stripe.
If you have assigned colors to your nodes, you can display the assigned colors in the coding stripes—refer to Set colors for more information.
Coding stripes are disabled (and do not update) while you type or make other changes to the content of the source. The stripes refresh automatically when you code or uncode source content, switch to read-only mode, save the project or use the 'undo' function. You can refresh the stripes manually—click the yellow information bar at the top of the coding stripes pane, or click Refresh, in the Workspace group, on the Home tab.
When you display coding stripes, the Coding Density bar is visible on the left of the display.

You can hover over the Coding Density bar to see the nodes that code the related content. The color graduations indicate the coding density—light gray (minimal coding) to dark gray (maximum coding). The coding density is calculated based on all nodes that code the content—not just those that are currently displayed in the coding stripes.
To see the coding done by different members of your team:
Open the required source or node.
On the View tab, in the Coding group, click Coding Stripes, and then click Select Items.

The Select Project Items dialog box opens.
NOTE If you have assigned colors to users—refer to Set project properties (Users tab options)—you can display the assigned colors in the coding stripes. Refer to Set colors for more information.
You can right-click on the coding stripe for a node and
Highlight Coding for that node (content is highlighted in yellow)
Open Node in Detail View
Uncode all content coded at the node
Hide the coding stripe
Show sub-stripes to 'split' the stripe into coding done by selected users
Hide sub-stripes
NOTE Highlight coding is not available in the associated view of a framework matrix.
You can choose to display the sub-stripes of a coding stripe—for example, from a coding stripe for the node green policy, you can show sub-stripes to see which users have coded the current content to that node. From a coding stripe for user MVC, you could split the stripe into sub-stripes that show each node MVC coded at.
To display sub-stripes:
Right-click on the required coding stripe.
Click Show Sub-Stripes.
Select the sub-stripe to display. This menu will display up to 9 sub-stripes only.
To select other sub-stripes, click on More Sub-Stripes.
The Select Project Item dialog opens. Select the nodes or users to display and click OK.
NOTE Before you open a sub-stripe, you can use your mouse to hover over a coding stripe to see the nodes the content is coded at or the users who coded the content.
By default, seven coding stripes are displayed when you choose to view the most, least or recently coded nodes.
To increase or decrease the default number of stripes for all sources and nodes that are subsequently opened:
Click the File tab, and then click Options.
The Application Options dialog box opens.
Click the Display tab.
In the Maximum number of stripes box, enter the required number of coding stripes (between 7 and 200).
Click OK.
The new default is available for newly opened sources and nodes.
NOTE You can also change the number of stripes for a specific source or node, refer to Change the number of stripes for more information.
When you choose the nodes most, least or recently coding options, you can change the number of coding stripes displayed:
Open the required source.
On the View tab, in the Coding group, click Coding Stripes, then click Number of Stripes.

The Number of Stripes dialog box is displayed.
Enter the number of stripes to display (between 7 and 200).
Click OK.
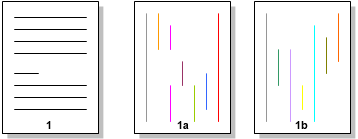
You can print a source or node along with its coding stripes. Each page of content is printed followed by its coding stripe pages. Refer to Print project items for more information.

By default, when coding stripes are printed, they will appear on a separate piece of paper after the project item (such as the document or node) that they apply to. However, by adjusting your printer settings, your coding stripes can appear on the same page as the relevant project item.
To do this, change the number of pages printed per sheet. Most printers will have an option for ‘Pages per sheet’. Change this option to 2, so that you are printing two pages on every sheet. Also ensure that your document is set to print in Portrait format, and you should be able to print pages 1 and 2 (that is, the project item and its coding stripes) next to each other on the same sheet.