In this topic

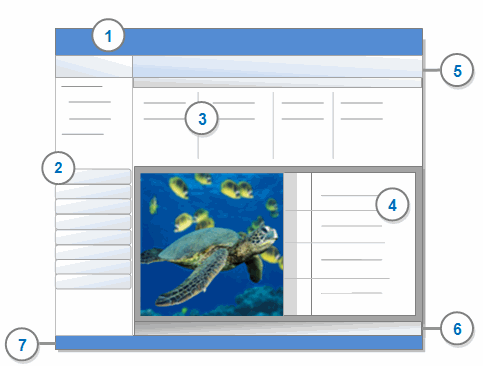
1 Ribbon
2 Navigation View
3 List View
4 Detail View
5 Find bar
6 Quick Coding bar
7 Status bar
The ribbon is designed to help you locate commands. Commands are organized into logical groups, collected together under tabs. Each tab relates to a type of activity, such as creating new project items or analyzing your source materials.
Refer to Use the ribbon, for detailed information about working with the ribbon. Refer to NVivo ribbon tabs for an overview of the commands on each ribbon tab.
This view provides access to all your project items. Items are organized under group buttons—for example, Sources, Nodes and Queries. When you click on a folder in Navigation View, its contents are displayed in List View.
You can access Navigation View folders using the Go commands—refer to Accessibility for more information.
You can add custom folders to organize your project items In Navigation View. Refer to Work with folders for more information.
You can customize or hide Navigation View—refer to Customize the workspace for more information.
This view displays the contents of your folders. You can double-click an item in List View to open it in Detail View.
In List View, you can:
Sort items (by clicking on the column headings)
Add selected items to sets
Delete, cut, copy, paste, print and export items
You can customize List View display by adding or removing columns—refer to Customize the workspace for more information.
In this view you can explore the content of your project items. For example, in Detail View you can:
Annotate or code the content of a source
See all the source content that has been coded at a node
View the results of a query
When you open a source or model (or open a report in Report Designer), it is displayed in Detail View in read-only mode and a yellow information bar appears at the top of the Detail View. If you need to edit the source, model or report, click the yellow bar to switch to edit mode—refer to Work in edit mode for more information.
You can undock Detail View, if you prefer to work with project items in a separate window—for more information refer to Customize the workspace (Display Detail View in a separate window).
You can open multiple items and use the tabs at the top of Detail View to move between them.
To close an item, click the ![]() at top-right of Detail View. To close all open items, on the View tab, in the Workspace group, click Close All.
at top-right of Detail View. To close all open items, on the View tab, in the Workspace group, click Close All.
The Find bar is displayed at the top of List View. It is a quick way to search for items in your NVivo project—refer to Find project items (Use the Find Bar to find project items by name) for more information.
You can hide the find bar. Refer to Customize the workspace for more information.
The Quick Coding bar is displayed at the bottom of a Detail View when you are working with sources and nodes. It provides a fast way to code or uncode and allows you to code by nickname.
You can undock the Quick coding bar so that it floats over the workspace—refer to Customize the workspace for more information.
You can also create nodes with the Quick Coding bar—refer to More manual coding techniques for more information.
The Status bar displays your user initials and contextual information that varies depending on what you are doing in your project.
For example, when you have a source open in Detail View, the Status bar shows:
Whether the source is read-only or in edit mode
The number of nodes that the source is coded at
The total number of coding references in the source