If you are familiar with NVivo 8, this topic will help you to understand the changes that have been introduced in NVivo 9.
For detailed information about the new features of NVivo 9, refer to What's new in NVivo 9.
In this topic
At the top of the NVivo window, you will notice that the menus and toolbars have been replaced by a ribbon. The ribbon was first introduced in Microsoft applications—it is designed to help users find, understand and use commands efficiently and directly.
For information about commands on the new ribbon, refer to NVivo ribbon tabs. For general information about working with the ribbon refer to Use the ribbon.
Remember that you can still right-click to access commands in context.
If you are familiar with NVivo 8 menus, you can download and use the NVivo 9 ribbon mapping spreadsheet to locate a menu command on the ribbon.
If you are familiar with NVivo 8, you will notice that a single Nodes folder replaces the Free Nodes, Tree Nodes and Cases folders to create a simpler and more flexible way to work with your node structures.
You can now create your own folders to organize your nodes—for example, you may have a folder for the nodes that represent 'cases' and another folder for nodes related to a specific theme.
If you open a project that was created in NVivo 8, folders are automatically created for your free nodes, tree nodes and cases—refer to Open a project created in an earlier version for more information.
You can still create 'free nodes'—they are simply nodes that do not have children.
To create a 'case', you just create a node and classify it. For example, create a node for an interview respondent, classify it as person and define the attribute values such as, age, sex and location. Refer to About nodes (creating nodes for people, places and other entities) for more information about how cases are handled in NVivo 9.
Refer to About nodes for more information.
If you are used to working with the casebook in NVivo 8, you will notice that the casebook is replaced by 'classification sheets' in NVivo 9.
Instead of opening the 'casebook', you open a classification sheet to see a list of all the nodes (or sources) that belong to the classification, including their attribute values.
For example, you could open the classification person to see all the nodes that represent people. You can filter and sort the nodes based on their attribute values, and you can change their attribute values if necessary.
You can still import 'casebook' information—refer to Import (or export) classification sheets for more information.
Search Folders for sources and nodes are now located under Collections in Navigation View.
In NVivo 9, you can also add your own custom search folders—refer to Create and customize Search Folders.
Navigation View has been rearranged and now includes new groups for Collections and Reports:
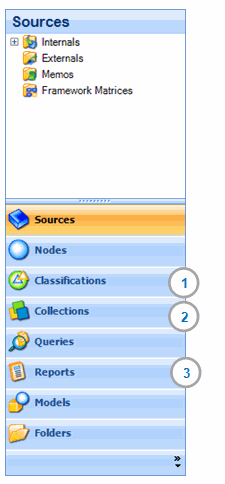
1 Classifications this group has changed position in the Navigation View and now provides access to source and node classifications and relationship types—refer to About classifications for more information.
2 Collections merges the original Sets and Links groups and contains sets, search folders, memo links, 'see also' links and annotations—refer to About collections for more information.
3 Reports provides access to predefined or custom-made reports and extracts—refer to About Reports and Extracts for more information.
The main change to working with sources and models in NVivo 9 involves the introduction of edit mode. By default, sources and models open in read-only mode and you need to switch to edit mode if you want change their content or format.
Read-only mode helps you to avoid accidently editing source content while coding. It also protects the integrity of your sources if you are working with other colleagues on an NVivo Server project—a source cannot be opened in edit mode by two users at the same time.
You cannot set the properties of a source to read-only in NVivo 9—a source is always read-only unless you put it in edit mode. Refer to Work in edit mode for more information.
Refer to What's new in NVivo 9 for more information about these new features.
You can show coding stripes when you are in edit mode.
Coding stripes are disabled (and do not update), while you type or make other changes to the content of the source. The stripes refresh automatically when you:
Code or uncode the source content
Switch to read-only mode
Save the project
Use the 'undo' function
You can refresh the stripes manually—click the yellow information bar at the top of the coding stripes pane, or click Refresh, in the Workspace group, on the Home tab.
Refer to Highlight coding and display coding stripes for more information on working with coding stripes.
You will notice that Text Search and Word Frequency queries have been enhanced to let you search for synonyms and semantically related words. You can still run a Text Search query that finds words with the same stem, by adjusting the Finding Matches slider to include stemmed words—refer to Understand text match settings for more information.
In NVivo 9, Grouped Find has become a query that you can save and rerun, you can also view the results as a connection map. Refer to Run a Group query for more information.
When working with a node matrix in NVivo 9 you can see the number of 'cases coded' by selecting to see the number of nodes in a selected classification—refer to Work with the content of a node matrix for more information.
Your NVivo 7 or 8 project will look slightly different when you open it in NVivo 9. For example:
Your free nodes, tree nodes and cases will be converted into nodes—you will find them grouped into folders under the Nodes folder.
A node classification called 'case' will be added in the Node Classifications folder under Classifications.
Refer to Open a project created in an earlier version for more information.