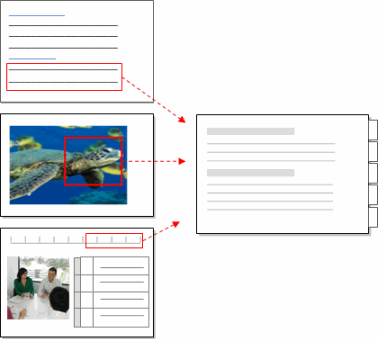
Nodes are central to understanding and working with NVivo—they let you gather related material in one place so that you can look for emerging patterns and ideas. You can create and organize nodes for themes or 'cases' such as people or organizations.
You can also create nodes to gather evidence about the relationships between items in your project.
In this topic
A node is a collection of references about a specific theme, place, person or other area of interest. You gather the references by 'coding' sources such as interviews, focus groups, articles or survey results.
For example, while exploring your sources (documents, datasets, pictures, video or audio) you could code any content related to 'illegal fishing practices' at the node illegal fishing. Then when you open the node (by double-clicking it in List View) you can see all the references in one place.

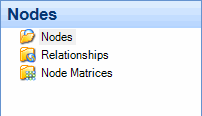
In Navigation View, under Nodes, there are folders for nodes, relationships and matrices—relationships and matrices are special types of nodes.

Relationships are nodes that define the connection between two project items. For example, you could create a relationship node to record the relationship between two of the case nodes in your project (perhaps two people are married to each other). Refer to About relationships for more information.
Node Matrices are cross-tabulations of nodes that shows how the contents of different nodes relate to each other. You create node matrices by querying your data using Matrix Coding queries. You cannot code at the nodes in a node matrix. Refer to About node matrices for more information.
Nodes are containers for your themes, people, places, organizations or other areas of interest. You can organize these nodes in hierarchies—moving from general topics at the top (the parent node) to more specific topics (child nodes)
Perceived causes of poor water quality
Industrial waste
domestic sewage
agricultural runoff
Respondents
farmers
Giacomo
Ari
fisheries
Franz
Vikram
If there is no logical connection between your nodes (or perhaps these connections are not yet apparent) you can just add nodes at the top level of the hierarchy:
water quality
alternative energy
government initiatives
When working with nodes in a hierarchy, you can gather all the material in child nodes and roll it up into the parent node. For example, you could analyze how each town is adapting to climate change or turn on aggregation for the node Adaptation to climate change and see how all towns are adapting:
|
|
|
The ![]() icon in the Aggregate column indicates that aggregation is turned on. This column is not visible by default—you can add the column to your node List View.
icon in the Aggregate column indicates that aggregation is turned on. This column is not visible by default—you can add the column to your node List View.
When you open a node that has aggregation turned on, you can see all content coded at the node and content coded at the direct child nodes.
For more information, refer to Aggregate nodes (gather all content in a parent node).
Just like sources, you can organize nodes in folders to suit the way you work:
Nodes
Respondents
Themes
Survey questions and responses
You can use folders to set the scope of a query—for example, run a Text Search query on all the material in the Survey questions and responses folder.
NOTE You cannot create your own subfolders within the Relationships and Matrices folders.
Do you already know which themes or topics you will be exploring? You can create a node structure before you begin coding, and easily add any nodes that emerge as you work through your sources. Refer to Create nodes manually for more information about setting up node structures in List View.
You might want to work 'up' from your sources, creating nodes as you go. At first, you might create nodes at the top level and then organize them into hierarchies when connections become apparent. Refer to Create nodes manually for more information about creating nodes as you explore your sources, including 'in vivo' coding,
You can also use queries to find and code content that relates to a particular theme at a new node. For example, you could run a Text Search query to find all references to development and automatically code this content at a new node.
If you have tightly structured source materials, then you can use NVivo's 'auto coding' features to do 'broad brush coding'. For example, you could gather all responses to a particular interview question at a node. You can then open these nodes and explore what people have said in response to a particular question, 'coding on' to create more nodes as your themes emerge. Refer to About coding (Auto coding structured content) for more information.
You might want to create nodes to represent people, organizations or other 'cases'. When you create a case node, you can record the attributes of the case (for example, a person's age or occupation). Once your case nodes are created, you can code source content relating to a particular case at its node, and then use queries to ask comparative questions based on attributes like age or occupation.
In NVivo, you record the attributes of the case by 'classifying' the node—this means setting the node's classification (for example, person) in the node's properties and then setting attribute values like age, sex and location.
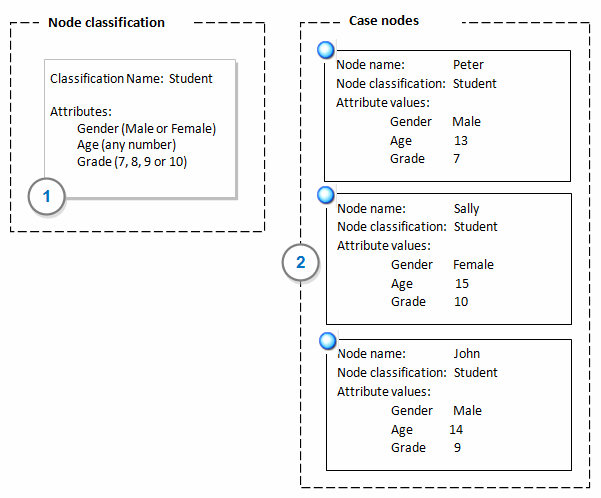
Imagine that you want to create case nodes to represent high school students you interviewed. You can do this manually as follows:

1 Create a new node classification called Student and add the attributes gender, age and grade to the classification.
2 Create a node to represent each student (for example, Peter, Sally and John), and then set the classification of each node to Student and then set the attribute values.
Now that your case nodes are created, you can code the responses of the different students to the node that represents them, and you can use queries to compare the responses by age or gender or grade.
You can set up your case nodes manually, but if you have a lot of cases, then NVivo provides ways to speed the process up, for example:
Select a number of nodes in List View and assign a classification—for example, select all the nodes representing people you interviewed and classify them as Student. You can open the classification sheet for the classification Student and set the attribute values for each student.
Import a classification sheet containing a list of nodes and their attribute values. For example, you could import a spreadsheet containing demographic information about the participants in a focus group. The nodes are created when you import the classification sheet.
If you have survey responses in a dataset, and the dataset includes demographic information about respondents—you can use the Classify from Dataset wizard to create and classify nodes representing each of the respondents. Refer to Approaches to analyzing datasets for more information.
If you have a set of interview documents, and each document contains the interview responses of a particular person; when you import the documents you can automatically create case nodes (and code the entire source to the case) during the import process. Refer to Import documents and PDF sources for more information.
You can classify nodes at any stage of your project but you may want to consider the following:
When you are collecting data make sure you record the descriptive information that supports the questions you want to ask. For example, if you want to compare attitudes based on location make sure you collect this information. You can store it directly in NVivo or in a separate file (text file or spreadsheet) and import it later.
You need to classify case nodes and code source content at the case nodes, before you can use queries to ask comparative questions—how are large organizations adapting to climate change? How do they differ from smaller organizations?
For more information refer to Classify nodes (set attribute values to record information).
Since relationships are nodes that describe the connection between two project items—you must create the project items first. For example, to create the relationship Industrial waste CAUSES poor water quality you must first create the nodes Industrial waste and poor water quality.
A node matrix is a collection of nodes resulting from a Matrix Coding query—you can run this query when you have enough nodes (and content coded at them) to make meaningful comparisons.
When you create a node (or edit its properties) you can give it a nickname. This nickname can be used as a fast way of coding your source content using the Quick Coding bar.
Refer to Give a node a nickname for more information.
You can select a node and see all the project items associated with it—refer to Create and work with graphs for more information.
When you open a node, you can see all the coded references in one place. You can look at a node summary or move through tabs to see all the text, dataset content, audio, video or pictures that have been coded at the node. When reviewing all the related material in a node you can
Filter the node to focus your analysis—for example, see all the coding done by a specific team member or filter the columns in a dataset to see the data for a specific attribute.
Annotate to record comments or reminders
Link the node to a memo that describes your analytical insights
'Code on' to other themes or topics
Refer to Review the references in a node for more information about working with nodes.